I guess ill be back to posting things soon... wait for my next update! Compose

4.11.11
20.7.11
Morning mashup: Complaints, Books and the Insanity that is Life
Ok, so yes, I'm still working on that whole updating regularly, but, in my defense, My computer's charger died, so I was forced into exile.
 This seemingly forced exile exposed me to something that truly worries me.... how absolutely addicted I am to technology. Now, fortunately I went out and about this weekend, I got to see some of my closest friends (and cuddle!). But what if i hadn't? When i got home i just sat, wondering what to do. I needed another escape. That is what I'm addicted to, escaping. I read a total of four books( which I shall review later). But i needed to remove myself from the boredom that was my life, and NOT BE PRODUCTIVE.
SO here is my new plan. I'm starting small, but I have developed a 6 week plan to better myself. Starting Tomorrow (not today because well... I already missed my chance) I will begin to slowly better myself, both in my mental and physical discipline. I have a list of things I shall do, out of this list I must choose to do at least 2 every day, and then there are other things that are non negotiable.
Now, The first 2 week2 will consist of:
- WAKE UP consistently early: No matter at what time I go to bed I will attempt to wake up at the same time every morning(6:30 am) I can do whatever I want between the times of 6 and 8, read, watch tv, draw, sew, but I CANNOT SLEEP.
- STUDY for 1 hour minimum per class each day: Right now I am taking two classes. That's two hours a day, If i have a test ill study more, but my minimum will be one hour, making sure I review and read.
-EAT: I fail at this, I miss meals and skimp on food. I either forget or put it off. gotta stop doing that so.... I'm going to eat at least two times a day, properly, a full meal. (See K? I'm trying to be healthy!)
 - DO two of the following for 1.5 hours every day:
Read
Sew
Draw
Ride bike (or other exercise)
Paint
Write
Meditate
Clean
This plan will continue this way for the first two weeks in an attempt to form a kind of routine, afterwards I shall change studying to 1.5 hours a day per class and make physical exercise and cleaning a permanent part of my day.
Ahem. yep, that.s the plan....
Now aside from that I have other things going on, like not having a job.
See last I heard of, I was happily employed here at my university as the assistant glassblower, but apparently, upon the beginning of the new fiscal year i was not placed on their budget. Oh yeah and also I WAS NOT TOLD, nor was my boss. So my boss comes back from her trip, I return from mine and lo and behold, When I go to hand in my hours for the week at the office and suddenly I'm told 'hey, you aren't working for us!'.
 How is it so difficult to email someone? To tell me.... to TELL MY BOSS, that hey! you don't have an assistant right now! So of course I asked what I could do. I like my job, I work hard and I'm good at it.. also I NEED IT. but alas, the answer to that question is "I'll talk to the department chair and see what we can do". Golly gee willikers; It has been a week, I haven't heard from them, I haven't been paid for the hours i worked and I don't know if I'm even going to return, so what not? look for a job and pray that my savings hold. I mean, its not like i have to pay for.. umm.. lets see, food, school, gas, everything...
ON THE BRIGHT SIDE, I have a bike, thanks to a dear friend of mine whose family has a tendency to hoard seemingly useless things!
As I mentioned earlier, I read quite a bit in the absence. Now I want to warn you, I LOVE BOOKS. Once I begin something, I hardly stop until I'm done. Books are like drugs, and if the weren't so expensive I would be the worlds most literate junkie. Now the books I'm going to quickly review are Beauty: A Retelling of the Story of Beauty and the Beast, by Robin Mckinley, and The Thief, by Megan Whalen Turner.
Both are considered children's fantasy and both are easy but wonderful reads.
First off, Beauty.
 Grace, Hope and Hounour are the three young daughters of a wealthy merchant in the city. Honour, who is known to everyone as Beauty, is the 'cunning one' in the family. Without the beauty that both her sisters have she has dedicated herself to learning and books, but when her father loses his fleet of merchant ships at sea, they are left with nothing. Forced to move into the country to survive, they move to a small town on the edge of an enchanted forest. After her father accidentally meets the Beast he is forced to make a deal to sacrifice himself or one of his daughters to the beast. Beauty, upon seeing her father's predicament decides to take his place and go with the Beast and begin her new life.
SO GOOD, I read it much too quickly and I shall read it again. The characters are so well built you can't help but love all of them, unlike most retellings of this story, the antagonist isn't a character but a situation. The hardships that the family goes through aren't caused by some nefarious villain, but by nature itself. This turns the story into one where you grow and hope with each character. You become immersed in a story that is surprisingly human, there is no evil villain out to get anyone, there is a family that you love and that you now deserves well trying their best within different (and yes, magical) situations.
Next is The Thief, by Megan Whalen Turner;
 Gen is a thief, and a good thief at that. After going to jail for bragging about, and stealing, the seal of the King of Sounis. He is enlisted by the king's chief adviser, The Magus to go steal a legendary stone from a neighboring country. Gen, seeing this as his chance, goes along with the Magus, his two assistants Sophos and Ambiades, and by Pol, a soldier. But Gen is a trickster with his own plan, as the Magus soon learns.
Gen is one of my new favorite main characters. The best part of this book is, usually when you have stories about thieves and fantasy, the author will focus on the details of their craft. you see each calculated move that the character makes. Now In this book Turner focuses on the characters and the story. As you follow gen you realize that stealing and pickpocketing are so natural to him that you don't even know he's stolen something until he pulls it out. This has the unique characteristic of just making the character more believable. Instead of proving his worth through exhausting descriptions, his talents are taken as a given.
And with this I end my post for the day.. I'm too tired to write anymore.
But remind me later that I have to review the Show White Collar, because it rocks my colourful socks...
SO here is my new plan. I'm starting small, but I have developed a 6 week plan to better myself. Starting Tomorrow (not today because well... I already missed my chance) I will begin to slowly better myself, both in my mental and physical discipline. I have a list of things I shall do, out of this list I must choose to do at least 2 every day, and then there are other things that are non negotiable.
Now, The first 2 week2 will consist of:
- WAKE UP consistently early: No matter at what time I go to bed I will attempt to wake up at the same time every morning(6:30 am) I can do whatever I want between the times of 6 and 8, read, watch tv, draw, sew, but I CANNOT SLEEP.
- STUDY for 1 hour minimum per class each day: Right now I am taking two classes. That's two hours a day, If i have a test ill study more, but my minimum will be one hour, making sure I review and read.
-EAT: I fail at this, I miss meals and skimp on food. I either forget or put it off. gotta stop doing that so.... I'm going to eat at least two times a day, properly, a full meal. (See K? I'm trying to be healthy!)
- DO two of the following for 1.5 hours every day:Read
Sew
Draw
Ride bike (or other exercise)
Paint
Write
Meditate
Clean
This plan will continue this way for the first two weeks in an attempt to form a kind of routine, afterwards I shall change studying to 1.5 hours a day per class and make physical exercise and cleaning a permanent part of my day.
 |
| Where can I get a discount dino? |
Ahem. yep, that.s the plan....
Now aside from that I have other things going on, like not having a job.
See last I heard of, I was happily employed here at my university as the assistant glassblower, but apparently, upon the beginning of the new fiscal year i was not placed on their budget. Oh yeah and also I WAS NOT TOLD, nor was my boss. So my boss comes back from her trip, I return from mine and lo and behold, When I go to hand in my hours for the week at the office and suddenly I'm told 'hey, you aren't working for us!'.
How is it so difficult to email someone? To tell me.... to TELL MY BOSS, that hey! you don't have an assistant right now! So of course I asked what I could do. I like my job, I work hard and I'm good at it.. also I NEED IT. but alas, the answer to that question is "I'll talk to the department chair and see what we can do". Golly gee willikers; It has been a week, I haven't heard from them, I haven't been paid for the hours i worked and I don't know if I'm even going to return, so what not? look for a job and pray that my savings hold. I mean, its not like i have to pay for.. umm.. lets see, food, school, gas, everything...ON THE BRIGHT SIDE, I have a bike, thanks to a dear friend of mine whose family has a tendency to hoard seemingly useless things!
As I mentioned earlier, I read quite a bit in the absence. Now I want to warn you, I LOVE BOOKS. Once I begin something, I hardly stop until I'm done. Books are like drugs, and if the weren't so expensive I would be the worlds most literate junkie. Now the books I'm going to quickly review are Beauty: A Retelling of the Story of Beauty and the Beast, by Robin Mckinley, and The Thief, by Megan Whalen Turner.
Both are considered children's fantasy and both are easy but wonderful reads.
First off, Beauty.

SO GOOD, I read it much too quickly and I shall read it again. The characters are so well built you can't help but love all of them, unlike most retellings of this story, the antagonist isn't a character but a situation. The hardships that the family goes through aren't caused by some nefarious villain, but by nature itself. This turns the story into one where you grow and hope with each character. You become immersed in a story that is surprisingly human, there is no evil villain out to get anyone, there is a family that you love and that you now deserves well trying their best within different (and yes, magical) situations.
Next is The Thief, by Megan Whalen Turner;
Gen is one of my new favorite main characters. The best part of this book is, usually when you have stories about thieves and fantasy, the author will focus on the details of their craft. you see each calculated move that the character makes. Now In this book Turner focuses on the characters and the story. As you follow gen you realize that stealing and pickpocketing are so natural to him that you don't even know he's stolen something until he pulls it out. This has the unique characteristic of just making the character more believable. Instead of proving his worth through exhausting descriptions, his talents are taken as a given.
And with this I end my post for the day.. I'm too tired to write anymore.
But remind me later that I have to review the Show White Collar, because it rocks my colourful socks...
21.6.11
OMG MORE PLUSHIES!
I have been making plushies.. Oh so many Plushies! So i have decided to dedicate this post to teaching you how to make them!
Now first you need a few things:
Felt
Needles
Glue
Scissors
Ideas
Ok! so now you have some felt colour and you wanna make something! First you'll need a pattern!
Here are a few good ones!
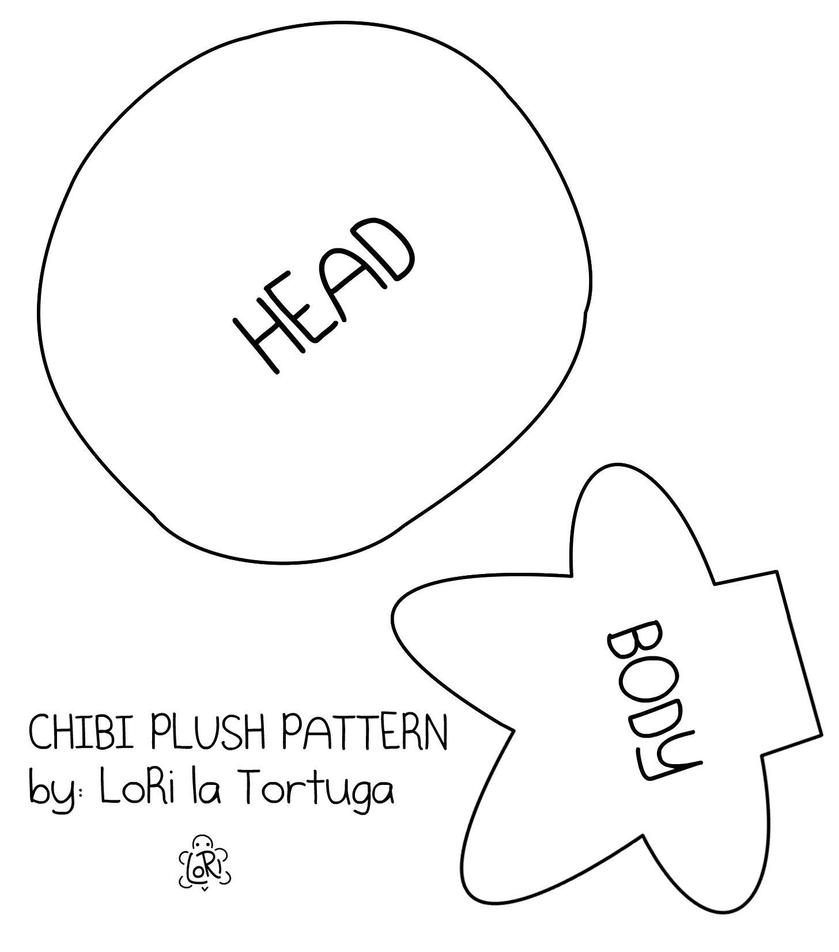
This is the pattern for a simple chibi plushie, nothing too big or too small.
Now, you take your pattern and use it to cute out the same shape in the cloth, then you sew it and flip it inside out. Then just stuff it and sew the body together and you are done!
Ok now you have a body, what do you do?
I find that clothing and hair go next. depending on your choice clothing will be easier or harder. Sometimes I find that making the body the same colour as the jeans you want your character to wear is the best choice.
If not the i use the body to cut out the pattern for the clothes and I try as best I can to fit them over my little plush. This [link] is a pretty good tutorial on how to make plushie hair.
No once you are done with that work on the face, do you want complicated detailed face or just simple eyes? What accessories doe the character have? a staff? a necklace? I keep a few random items (play dough, wire, paint) at hand to make such things.
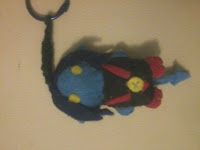
This is a simple explanation, I'll be adding pictures later but for now ill just show you a few that I've made and then add some better ones for each step.


Now first you need a few things:
Felt
Needles
Glue
Scissors
Ideas
Ok! so now you have some felt colour and you wanna make something! First you'll need a pattern!
Here are a few good ones!
This is the pattern for a simple chibi plushie, nothing too big or too small.
Now, you take your pattern and use it to cute out the same shape in the cloth, then you sew it and flip it inside out. Then just stuff it and sew the body together and you are done!
Ok now you have a body, what do you do?
I find that clothing and hair go next. depending on your choice clothing will be easier or harder. Sometimes I find that making the body the same colour as the jeans you want your character to wear is the best choice.
If not the i use the body to cut out the pattern for the clothes and I try as best I can to fit them over my little plush. This [link] is a pretty good tutorial on how to make plushie hair.
No once you are done with that work on the face, do you want complicated detailed face or just simple eyes? What accessories doe the character have? a staff? a necklace? I keep a few random items (play dough, wire, paint) at hand to make such things.
This is a simple explanation, I'll be adding pictures later but for now ill just show you a few that I've made and then add some better ones for each step.


13.6.11
I FINISHED IT!!!!!
FINALLY! I just finished the Mario quilt that I have been working on for so long. 4 Months of work, creating, destroying and everything I have done. This is the result of all of that work:


8.6.11
Adorable totoro plush: How To
I was bored and I wanted to make a plush, so I made a pattern for a Totoro plush.

 This little guy is what came out of my random spurt of creativity. So if you wanna make him, here's the materials:
-A needle and thread
-Grey felt
-White felt
-Glue for cloth
-black paint for cloth, or acrylic paint
- green felt (optional)
- stuffing for plushies(or you can use the scraps of what you just made, which is what i did today)
-Scissors
SO, where do you start?
Well I started by making a paper pattern, and using it to cut the felt. Here it is:
Using this, I cut out all of the felt pieces I needed (pictured up there with the materials). The first thing I did was make the ears, to do this you have to take the glue, smear it on one side of the ear and then roll it up, letting it glue together. the little tabs on the pattern let you stitch
it and sew it into the body. Here are a few pics of what I mean:
Once you are done with that you can start sewing. Now the stitch I'm using, well, I'm certain it has a name, but I do not know it, so Ill show you how to do it as best I can, and hopefully you'll understand.
 Now you start with a basic stitch, but just as you are about to pull through, instead of going through completely, you slip you needle through it, as if to make a knot. You pull and go to the next one. So basically you keep going through it, making a knot with each stitch. It makes a pretty edge and allows you to sew without having to turn anything inside out.
Once you are done with the body you stuff it and sew on the little bottom. Next you sew on the arms and the tail and finally the belly.
Use the glue to glue on the eyes and leaf on the head and then use the black paint to make his nose and eyes.
And there! you're done :D
Now mind you written down this seems very simple. In reality it will take you a little while and lots of things change. For example the bottom of the pattern that I originally made got shortened because once the plush was full I noticed the size changed.

 This little guy is what came out of my random spurt of creativity. So if you wanna make him, here's the materials:
-A needle and thread
-Grey felt
-White felt
-Glue for cloth
-black paint for cloth, or acrylic paint
- green felt (optional)
- stuffing for plushies(or you can use the scraps of what you just made, which is what i did today)
-Scissors
SO, where do you start?
Well I started by making a paper pattern, and using it to cut the felt. Here it is:
 |
| Click to enlarge |
Using this, I cut out all of the felt pieces I needed (pictured up there with the materials). The first thing I did was make the ears, to do this you have to take the glue, smear it on one side of the ear and then roll it up, letting it glue together. the little tabs on the pattern let you stitch
it and sew it into the body. Here are a few pics of what I mean:
 |
| Roll up |
 |
| Put glue on |
 |
| I glued them to the body to hold them while I sew |

 | |||
| The tail; I wasnt worried about the stitch showing. |
Once you are done with the body you stuff it and sew on the little bottom. Next you sew on the arms and the tail and finally the belly.
Use the glue to glue on the eyes and leaf on the head and then use the black paint to make his nose and eyes.
And there! you're done :D
Now mind you written down this seems very simple. In reality it will take you a little while and lots of things change. For example the bottom of the pattern that I originally made got shortened because once the plush was full I noticed the size changed.
 |
| See, he loves you~ |
2.6.11
Pirates Pirates Pirates!!!
A few days ago, I went to see Pirate of the Caribbean 4 and I fell in love. Not in love with Johnny Depp (who is quite sexy), not in love with Penelope Cruz (Who is also incredibly sexy). Oh no. I fell in love with the wardrobe!! Oh You have no idea how much I wanted to wear EVERYTHING Penelope Cruz was wearing. In any case, I began Planning the Minute I got home, I wanted to take her wardrobe from the movie and adapt it to a style that I could wear. I decided on three outfits. A dress (though it ended up more as a top and skirt combo). A shirt, and a coat.
First the coat:
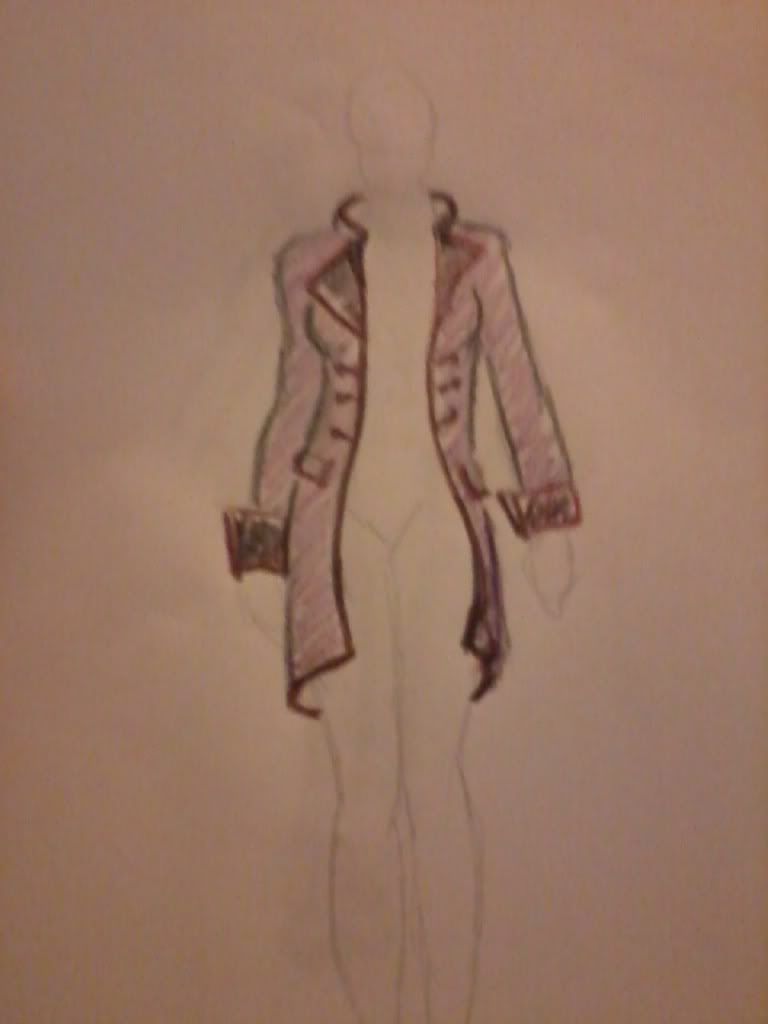 This is my version of the coat that she wears in the movie. I haven't changed much, only adjusted it slightly the buttons are something I'm still working on , but I'll work it out better when begin the actual pattern.
Next comes the top:
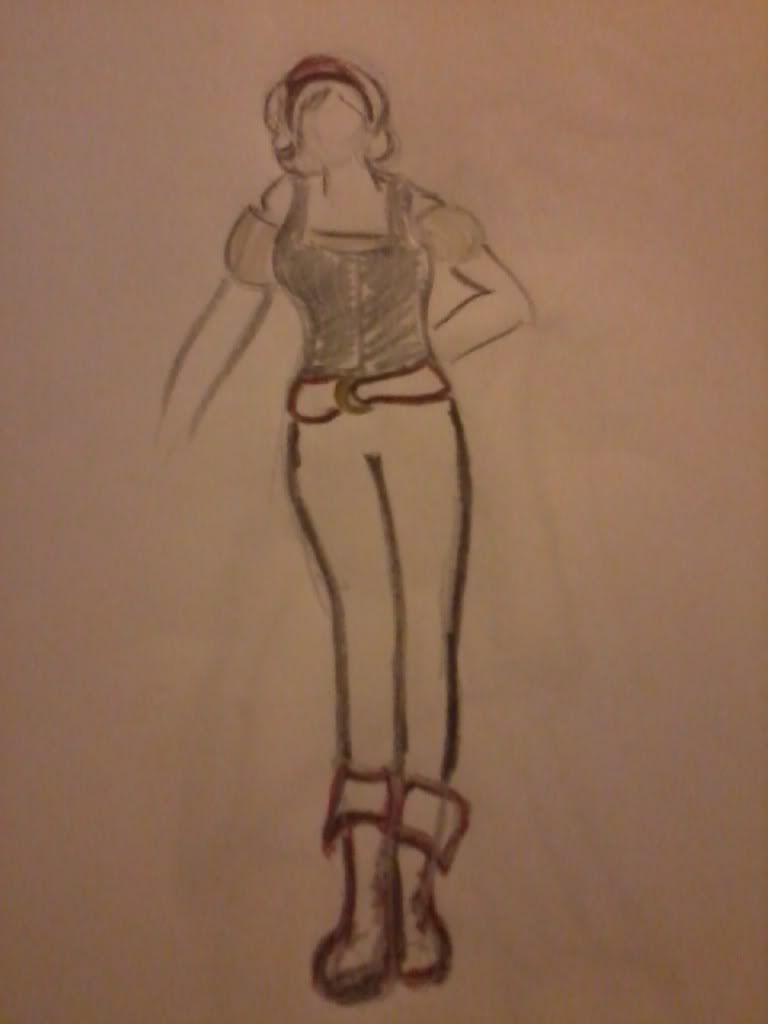 this is a simple vest and a white undershirt. It will go with tight pants, probably leggings and some nice boots. I need a rather large belt as well and a bandana to top it off. The only thing I'd be making right now is the vest.
And finally the 'dress':
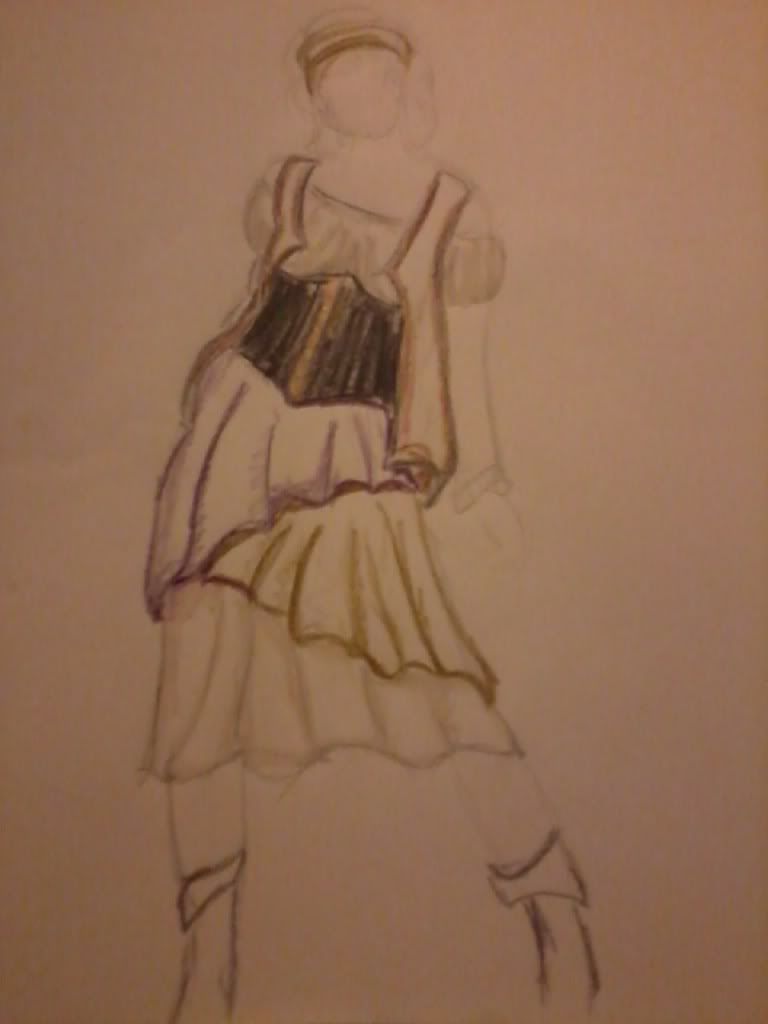 The dress incorporates the vest, its got to be a heavy fabric, I'd use floral or lace pattern probably. The and underbust corset with a lace front. and finally an uneven layered skirt, alluding to a typical wench skirt, but I want it to drape more.
Now I'm no expert in fashion or design in any way, so this is me just starting to make my own patterns... but SO far, this is definitely what I wanna try out next :)
First the coat:
Next comes the top:
And finally the 'dress':
Now I'm no expert in fashion or design in any way, so this is me just starting to make my own patterns... but SO far, this is definitely what I wanna try out next :)
Keep Your days in order!
I have created a calendar based on the Life Calendar concept. you get to draw an image for every day that is pictured. Now As much as I like it, its a bit too big and too small. It has all of the days of the year, so too big, and its little images are just too small to add anything... so I made my own version, and of course, added my own touch to it!
 Here is a picture of me actually using it:
 Why is this so much fun...


27.5.11
Glass!
Now it is time for me to talk about something I actually know about: Flameworking.
Glassblowing is usually though of as a large setup. You have the furnace, glory hole, oven. Its thought of a big brawny men with a hugle glob of glass working and blowing and creating. But I'm here to talk to you about another type of glass-working. Flameworking or lampworing is the art of using a torch to work glass rods and tubes and melt them, using different tools and techniques to work them.
Now in this technique is what is used to make different scientific apparatus along with different glass artworks like glass beads and models.
Now usually I would take the time to show you how to make things, but today I'm going to tell you how I started flameworking, and why I love it so, and maybe, you'll decide to try it too.
The truth is I was stressed, I wanted to try working on something or taking a class that would allow me to relax. As you already know I love to create and make things and I had always been interested in making things out of glass, so I looked for a class in my university. Alas, they had no such thing, but they did have a glassblower. A few emails, days and maps of the department basement later I was learning the basics of glass.
Now chemical glassblowing is different from artistic. For one thing the most commonly used glass is borosilicate, the type of flame and heat used to work borosilicate is different that that of artistic. I learned boro first. Now borosilicate is better for science, it withstands the shock or rapid temperature changes that characterize some reactions. Soft glass is usually used for artistic glassblowing. It needs to be heated slowly and has a tendency to crack when put into too hot a flame, the reason it is used for artistic glass though, is that it has beautiful bright colours that you just cant achieve with borosilicate. I was taught to put special glasses to protect my eyes, hot to use the torch, turn it on, control the different types of flames and work the glass.
I started with simple pendants. I was taught how to melt a rod into a blob "It all starts with a blob" I was told. At the time I didn't realize how true this was. At first I went to have fun, look at how the glass melted; it was shiny and beautiful, it would melt and flow, glowing bright under my glasses. I wanted to see what I could do. At first it was just trying random things within the little I knew, but the more I went down there the more I became curious as to what the glassblower next to me was doing. I began to ask and learn, first artistic, then scientific. Nothing specific, it was always how to make a seal, a flower, a giraffe. Slowly my curiosity evolved into something more, I began to look at the books my teacher had, I began to learn techniques, not so that I could try one thing, but with the purpose of putting them together, or making something more. After about a year of going in every chance I got I began to learn how to fix things. She had so many things that were useless and broken. They were gifts of sorts, as labs moved out we were given their old glassware.
It was then that I began to realize that this was more than a hobby for me. As i learned how to fix simple cracks I learned to admire what my teacher did in a new light. I watched her fix things with this flow and ease that escaped me every time I tried to do the same. I began to practice fervently, trying to learn what I could, gathering the courage to ask her if I could help around the shop. I had jokingly suggested it before, but it wasn't until a series of events made my working there a possibility that I began to really work.
Now I am thinking about studying this as a profession. Of changing everything I had once thought to do because this art has enthralled me beyond my wildest imagination.

Glassblowing is usually though of as a large setup. You have the furnace, glory hole, oven. Its thought of a big brawny men with a hugle glob of glass working and blowing and creating. But I'm here to talk to you about another type of glass-working. Flameworking or lampworing is the art of using a torch to work glass rods and tubes and melt them, using different tools and techniques to work them.
Now in this technique is what is used to make different scientific apparatus along with different glass artworks like glass beads and models.
 |
| See, I can still find cute animals to decorate my posts.... they're just made of glass... Source |
Now usually I would take the time to show you how to make things, but today I'm going to tell you how I started flameworking, and why I love it so, and maybe, you'll decide to try it too.
The truth is I was stressed, I wanted to try working on something or taking a class that would allow me to relax. As you already know I love to create and make things and I had always been interested in making things out of glass, so I looked for a class in my university. Alas, they had no such thing, but they did have a glassblower. A few emails, days and maps of the department basement later I was learning the basics of glass.
Now chemical glassblowing is different from artistic. For one thing the most commonly used glass is borosilicate, the type of flame and heat used to work borosilicate is different that that of artistic. I learned boro first. Now borosilicate is better for science, it withstands the shock or rapid temperature changes that characterize some reactions. Soft glass is usually used for artistic glassblowing. It needs to be heated slowly and has a tendency to crack when put into too hot a flame, the reason it is used for artistic glass though, is that it has beautiful bright colours that you just cant achieve with borosilicate. I was taught to put special glasses to protect my eyes, hot to use the torch, turn it on, control the different types of flames and work the glass.
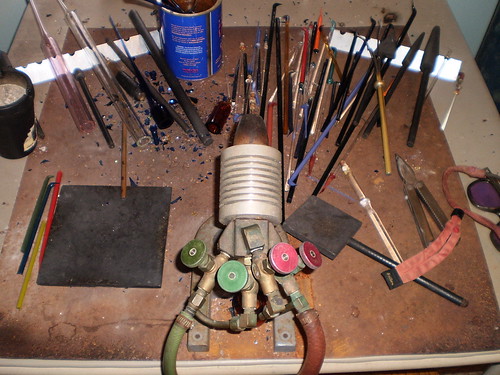 |
| This is what my desk usuallly looks like... Source |
It was then that I began to realize that this was more than a hobby for me. As i learned how to fix simple cracks I learned to admire what my teacher did in a new light. I watched her fix things with this flow and ease that escaped me every time I tried to do the same. I began to practice fervently, trying to learn what I could, gathering the courage to ask her if I could help around the shop. I had jokingly suggested it before, but it wasn't until a series of events made my working there a possibility that I began to really work.
Now I am thinking about studying this as a profession. Of changing everything I had once thought to do because this art has enthralled me beyond my wildest imagination.
23.5.11
Painting for fun :D
Painting is one of my favorite pastimes. To take paint and create (which you already know I love doing) is seriously fun; but it can also be very intimidating. SO how do you go about making a nice painting?

Well as anything practice is the key but there are certain steps that you can follow to get better at your work.
Well the first step is really choosing what to draw. If you start with a drawing you'll get a good idea of what works and what doesn't. Be sure to use the drawing to not only get the shapes of things, but to define lights and darks. you can do it black and white, or colour, whatever you decide make sure you deveop your concept. You don't have to have everything laid out perfectly, but define the parameters of what you want. Here is an example drawing of a painting i recently started. Its coloured and defines what I want. I just had a concept and ran with it.

 The second step for me is drawing on the canvas and choosing a colour palette. The palette for my painting will be based mostly on the colour blue so i painted the base in blue. Basically draw what you can in a really liquified state. I guess here we need to talk about materials, I paint with oil and watercolour mostly, but acrylic is a good option as well. With oil use paint thinner (turpentine, mineral spirits, ect.) to water down your paint, both acrylic and watercolor can be watered down by water (duh!). But this watered down version gives you an idea of what you need while still giving you the freedom to fix things that look weird with thichker coats of paint later.
Now we can start with thicker coats of paint. The more paint you add, remember, the harder it is to change later. But really the most unforgivable medium of the three is watercolour which is difficult to handle. once the paper absorbs something, its nearly impossible to fix, so that planning stage is very important for watercolor. This painting that you are looking at is in oil, which is most forgiving. the paint takes days to try so you have a chance to clean it off.


This is the place to make changes, start adding the colors and change everything. Try to work in layers. The things you want to be in the background work on first. and the build on it. Those things that you want the person to focus on most work on them in detail. Pull things forward by working on them, when you look at something you naturally take in the detail of what is in front of you first, the more you focus on an object the more the objects in the background become fuzzy, use this to your advantage. Now, you can also make big changes and move things. Remember that the paint can cover itself. If you work with acrylic wait for it to dry to cover things. If its oil use the thinner to remove paint or paint over what you have., but remember oil will mix with itself, if it is still wet.

This is what I have so far, but mind you I'm not done. You can spend as much time as you want on a painting, until you think is done or you grow tired of it (I have done that, just leave it for a while, then pick it up again).
I hope this helps! I don't know how useful it really is, but these are the steps that I use to paint things.
21.5.11
Mario blanket!!
Hey! remember that post where I talked about the Mario blanket i was working on? We behold! it is almost done!! BWAHAHAHAHA!!!

YESSSSSSS
Its still missing a few things, it gets a tunnel in the second lvl and it gets a grey trim around it with a grey backing as well... but that takes a sewing machine, which i lack.. but when I can, I will!

YESSSSSSS
Its still missing a few things, it gets a tunnel in the second lvl and it gets a grey trim around it with a grey backing as well... but that takes a sewing machine, which i lack.. but when I can, I will!
16.5.11
Random hiatus
 |
| But only for a while. |
15.5.11
FLYING AWAY!!!
Take off your shoes, put them and your jacket and your wallet in a bin. The computer goes in it's own bin, the bag goes alone, the guitar goes all alone (poor dearie). Walk through.... BEEP BEEP BEEP

Yup, airports the most gloriously hated places in the world. Sure, they get you to your destination, but every year it gets worse and worse! And alas, today I am in one... right now, sitting here.... all I can hope is that the plane ride will be quiet and warm enough to sleep and that my flight doesn't get delayed again. BU since I love lists so much I have a list of things to entertain you at airports! (and planes).
NUMBER ONE:
 Bring technology! we live in a highly technological age, most airports have free wifi and mostly everything can connect to wifi so bring your computer, iPod, iPad, tablet or wifi enabled teddy bear and enjoy the gloriously time consuming power of the internet. Do things like read blogs (like mine!) or write a blog post, or stumble, or see how many clicks it takes to get from sardines to Hitler on Wikipedia(which is surprisingly entertaining).
TWO:
Listen to music!
Remember that technology you had earlier? yeah, remember that it can play music too. You can sit there listening to the soothing sounds of death metal while the world passes you by. BUT make sure you are still able to listen to the airline announcements, that is the only way you can be sure that you get on when you need to.

THREE:
Reading!
Remember what that is? you know, from a book? My suggestion is bring something light, something that doesn't require too much focus or is too heavy. You need to be able to listen and watch what is going on around you, something too engrossing could prove terrible (like this one time, when i was the last one to get on the plane because the book i was reading was so good).
FOUR:
Knitting or amigurumi, see i used to sew on planes, but then they decided that needles weren't safe and whatnot so now bring a plastic knitting needle and sit down calmly, you've got time, limited space and nothing else to do.
I would give you more but alas, its time to get onto the plane, byes!

Yup, airports the most gloriously hated places in the world. Sure, they get you to your destination, but every year it gets worse and worse! And alas, today I am in one... right now, sitting here.... all I can hope is that the plane ride will be quiet and warm enough to sleep and that my flight doesn't get delayed again. BU since I love lists so much I have a list of things to entertain you at airports! (and planes).
NUMBER ONE:
Bring technology! we live in a highly technological age, most airports have free wifi and mostly everything can connect to wifi so bring your computer, iPod, iPad, tablet or wifi enabled teddy bear and enjoy the gloriously time consuming power of the internet. Do things like read blogs (like mine!) or write a blog post, or stumble, or see how many clicks it takes to get from sardines to Hitler on Wikipedia(which is surprisingly entertaining).TWO:
Listen to music!
Remember that technology you had earlier? yeah, remember that it can play music too. You can sit there listening to the soothing sounds of death metal while the world passes you by. BUT make sure you are still able to listen to the airline announcements, that is the only way you can be sure that you get on when you need to.
THREE:
Reading!
Remember what that is? you know, from a book? My suggestion is bring something light, something that doesn't require too much focus or is too heavy. You need to be able to listen and watch what is going on around you, something too engrossing could prove terrible (like this one time, when i was the last one to get on the plane because the book i was reading was so good).
FOUR:
Knitting or amigurumi, see i used to sew on planes, but then they decided that needles weren't safe and whatnot so now bring a plastic knitting needle and sit down calmly, you've got time, limited space and nothing else to do.
I would give you more but alas, its time to get onto the plane, byes!
7.5.11
Food and Finals
Forgive me for not updating regularly, Finals have me all tied up :O

So today Im going to share a dinner recipe with you, a full meal consisting of a simple onion soup, tortellini in a creamy alfredo sauce, salad with a mango dressing, and flan for dessert!
I have to say, I love food, it makes me happy to cook and to eat. I am constantly trying to find new recipes to try and make! Sometimes though, all I want is to have people over and relax with a nice meal, so I have some tried and tested recipes that make everything easier and tastier.
So here goes, first the onion soup!
I usually try to start the soup a while before everything else, that way i can keep it boiling and happy while everything else is cooking. This recipe serves about 4-6 people depending on how much they eat.
Ingredients:
2 teaspoons Butter
2 whole onions (chopped)
1 tablespoon balsamic vinegar
1 clove of garlic (completely crushed)
1/8 cup Cilantro (chopped)
1/8 cup Parsley (chopped, but with some of it whole for decoration later)
one sprig of thyme (optional)
Parmesan cheese
2 cans of beef broth (approx 28 oz.)
 Ok so this is really easy, take the(medium sized to rather large) pot that you are going to be using and take the butter and the chopped onions. Put it on high and let the butter melt into the pot and start to sizzle a bit, add the onions and let them become glossy and golden brown. then add the balsamic vinegar. stir that together for a about half a minute, letting the flavors mix, then add the garlic, then the cilantro and parsley (as much or as little as you desire, I usually add very little, but that's because I don't like it that much). Now add the beef broth and the thyme, add an extra cup of water, put it at a medium heat and biol for about 10 minutes. After that lower the heat and let it simmer for another 20 to 30 minutes. That's it! When you are going to serve serve with toasted bread on the side (for dipping) and sprinkle some cheese on top, and a few parsley leaves for decoration and serve!
Next Comes the tortellini! This is one of my favorite quick recipes, just because it fill you up and takes minimal effort, which is great if you are tired.
Ingredients!
sauce:
1 cup (1/2 pint, 8 oz.) of heavy cream
1/4 cup ( half a stick) of butter
2/3 cup (6 oz) of parmesan cheese
2 cloves garlic (crushed and/or pureed)
1 tablespoon of parsley (dry flakes or freshly cut)
1 teaspoon of black pepper
1/2 cup of cut carrots (optional)
1/3 cup of peas (optional)
1/3 cup of finely chopped onions
1/3 cup of corn(optional)
about 5 strips of bacon, cut into strips
1lb (16 ounces) of chicken brest, chopped into squares or small strips
1 teaspoon of salt)
Pasta:
hah! like I'm going to make you make your own pasta! just buy a pack of pre-made tortellini in the store.
 ok so obviously the hard thing here will be the sauce. The pasta itself is quite simple. We are going to start with the chicken, bacon and vegetables. In a large pan take bacon strips and turn the pan at a high heat. Now depending on how you like your bacon ( crispy or soft) you should keep it moving and let it cook all over, becoming brown and as crispy as you want it (multiple taste tests are necessary you know).
Once the bacon is done to your liking (you may remove some of the bacon grease but make sure to leave some for the veggies and chicken) you will add the onions and sauté them, this is also the time to add all of those optional vegetables! They will become softer and glossy, once this has happened, add the chicken. Put the heat on high and add the garlic and the pepper.
lower the heat to a medium and add 1/2 a cup of water and the salt, leave it simmering and get ready to start the rest of the sauce.
Now in a medium saucepan add the heavy cream and the butter, let the butter melt into the cream at medium heat, stirring it constantly (this is a good time to get the pasta boiling). Stir the cheese in slowly, sprinkling it in as you stir it. the cheese will melt into the cream and create a thick sauce. Once you have incorporated all on the cheese, go check on the chicken. The little water in the chicken should have reduced a bit, now add the creamy sauce to it and stir it together in the pan, letting it mix the broth that has formed, put this at a medium heat, stir it for about two minutes, then lower it and let simmer while you strain the pasta. Serve the pasta and pour the sauce on top add some cheese and parsley on top, for show, and serve to your guests!
 Next we have the salad. Now, I personally dont like salads... but so many people do I've had to learn how to make them... not that I mind. This salad has a mango dressing, its a sweet contrast to the flavorful food we already have, but it adds a nice contrast and goes well with the meal.
Ingredients:
Now, the salad you can make on your own, choose whatever salad you like most. I usually go with avocado, which I'm told goes very well with this.
2 Mangoes (remove the skin and take the bits of mango off the pit dice this as finely as you possibly can)
1/8 cup of white vinegar
2 tablespoons of olive oil
2 tablespoons of honey
1 teaspoon of lime zest
1 tablespoon of lime juice
1 tablespoon of orange juice
1 tablespoon of finely chopped cilantro (or dry cilantro)
1 teaspoon of finely chopped mint leaves (optional)
Now, what we are going to do here is take the mint, mango and cilantro into a medium sized bowl and mix it together, make sure everything is finely chopped. if you want you can use a food processor, but don't let it become too pulverized. Then add all of the liquid and the lime zest. Use the orange you have left over for the salad itself, and the lime for garnish.
Finally there is dessert!
 First I was wondering what to make for dessert.. but i decided on something simple (not flan, though you can expect that recipe soon). So in this case Ice cream and brownies is the meal of the day, along with some chocolate syrup.
Now the day of, night before make simple brownies. You can either make the out of a box or use an online recipe (I like This one {link!})
then when you want to serve, serve them hot (or warm them in the microwave) and put a scoop of ice cream on top. Add some chocolate syrup and you are ready to go!
Well, that's it. A complete meal that's tasty and simple to do. It may seem a lot of work, but I think that is mostly because its a lot of food. In any case I can assure you that everything here takes less than 40 minutes to prepare and serve (mind you its a lot of food) So enjoy! Also, post any recipes that you like down in the comments... I always like trying new things!
So today Im going to share a dinner recipe with you, a full meal consisting of a simple onion soup, tortellini in a creamy alfredo sauce, salad with a mango dressing, and flan for dessert!
I have to say, I love food, it makes me happy to cook and to eat. I am constantly trying to find new recipes to try and make! Sometimes though, all I want is to have people over and relax with a nice meal, so I have some tried and tested recipes that make everything easier and tastier.
So here goes, first the onion soup!
I usually try to start the soup a while before everything else, that way i can keep it boiling and happy while everything else is cooking. This recipe serves about 4-6 people depending on how much they eat.
Ingredients:
2 teaspoons Butter
2 whole onions (chopped)
1 tablespoon balsamic vinegar
1 clove of garlic (completely crushed)
1/8 cup Cilantro (chopped)
1/8 cup Parsley (chopped, but with some of it whole for decoration later)
one sprig of thyme (optional)
Parmesan cheese
2 cans of beef broth (approx 28 oz.)
Ok so this is really easy, take the(medium sized to rather large) pot that you are going to be using and take the butter and the chopped onions. Put it on high and let the butter melt into the pot and start to sizzle a bit, add the onions and let them become glossy and golden brown. then add the balsamic vinegar. stir that together for a about half a minute, letting the flavors mix, then add the garlic, then the cilantro and parsley (as much or as little as you desire, I usually add very little, but that's because I don't like it that much). Now add the beef broth and the thyme, add an extra cup of water, put it at a medium heat and biol for about 10 minutes. After that lower the heat and let it simmer for another 20 to 30 minutes. That's it! When you are going to serve serve with toasted bread on the side (for dipping) and sprinkle some cheese on top, and a few parsley leaves for decoration and serve!Next Comes the tortellini! This is one of my favorite quick recipes, just because it fill you up and takes minimal effort, which is great if you are tired.
Ingredients!
sauce:
1 cup (1/2 pint, 8 oz.) of heavy cream
1/4 cup ( half a stick) of butter
2/3 cup (6 oz) of parmesan cheese
2 cloves garlic (crushed and/or pureed)
1 tablespoon of parsley (dry flakes or freshly cut)
1 teaspoon of black pepper
1/2 cup of cut carrots (optional)
1/3 cup of peas (optional)
1/3 cup of finely chopped onions
1/3 cup of corn(optional)
about 5 strips of bacon, cut into strips
1lb (16 ounces) of chicken brest, chopped into squares or small strips
1 teaspoon of salt)
Pasta:
hah! like I'm going to make you make your own pasta! just buy a pack of pre-made tortellini in the store.
ok so obviously the hard thing here will be the sauce. The pasta itself is quite simple. We are going to start with the chicken, bacon and vegetables. In a large pan take bacon strips and turn the pan at a high heat. Now depending on how you like your bacon ( crispy or soft) you should keep it moving and let it cook all over, becoming brown and as crispy as you want it (multiple taste tests are necessary you know).Once the bacon is done to your liking (you may remove some of the bacon grease but make sure to leave some for the veggies and chicken) you will add the onions and sauté them, this is also the time to add all of those optional vegetables! They will become softer and glossy, once this has happened, add the chicken. Put the heat on high and add the garlic and the pepper.
lower the heat to a medium and add 1/2 a cup of water and the salt, leave it simmering and get ready to start the rest of the sauce.
Now in a medium saucepan add the heavy cream and the butter, let the butter melt into the cream at medium heat, stirring it constantly (this is a good time to get the pasta boiling). Stir the cheese in slowly, sprinkling it in as you stir it. the cheese will melt into the cream and create a thick sauce. Once you have incorporated all on the cheese, go check on the chicken. The little water in the chicken should have reduced a bit, now add the creamy sauce to it and stir it together in the pan, letting it mix the broth that has formed, put this at a medium heat, stir it for about two minutes, then lower it and let simmer while you strain the pasta. Serve the pasta and pour the sauce on top add some cheese and parsley on top, for show, and serve to your guests!
Ingredients:
Now, the salad you can make on your own, choose whatever salad you like most. I usually go with avocado, which I'm told goes very well with this.
2 Mangoes (remove the skin and take the bits of mango off the pit dice this as finely as you possibly can)
1/8 cup of white vinegar
2 tablespoons of olive oil
2 tablespoons of honey
1 teaspoon of lime zest
1 tablespoon of lime juice
1 tablespoon of orange juice
1 tablespoon of finely chopped cilantro (or dry cilantro)
1 teaspoon of finely chopped mint leaves (optional)
Now, what we are going to do here is take the mint, mango and cilantro into a medium sized bowl and mix it together, make sure everything is finely chopped. if you want you can use a food processor, but don't let it become too pulverized. Then add all of the liquid and the lime zest. Use the orange you have left over for the salad itself, and the lime for garnish.
Finally there is dessert!
First I was wondering what to make for dessert.. but i decided on something simple (not flan, though you can expect that recipe soon). So in this case Ice cream and brownies is the meal of the day, along with some chocolate syrup. Now the day of, night before make simple brownies. You can either make the out of a box or use an online recipe (I like This one {link!})
then when you want to serve, serve them hot (or warm them in the microwave) and put a scoop of ice cream on top. Add some chocolate syrup and you are ready to go!
Well, that's it. A complete meal that's tasty and simple to do. It may seem a lot of work, but I think that is mostly because its a lot of food. In any case I can assure you that everything here takes less than 40 minutes to prepare and serve (mind you its a lot of food) So enjoy! Also, post any recipes that you like down in the comments... I always like trying new things!
 | |||||||
Disproven! this is tasty, good for you and pretty easy!
|
3.5.11
Stress and How to Deal~
I have strange way of dealing with stress.. everybody does. Everyone gets stressed and everyone finds a way to deal. I'm going to go over different ways of relieving stress, why because finals are coming and I'm going a bit crazy.
 So what are ways that you can relax focus properly on your finals? how can you relieve al of the stress of work, school, home life, and anything else you might be freaked about?
 1) Exercise:
Exercising seems like something a bit difficult to do, especially when you are swamped with work. In reality it truly is, you come home tired, you wake up early, all you want to do is relax. Why bother?
First of all, it gives you energy. Wake up and do a small exercise routine, jog, stretch lift weights, whatever. After a few days on the routine it will be easier to wake up, and you'll look good. Also, it reduces the levels of cortisol, a stress hormone that makes you fat.. literally, it stores body fat and makes it harder to lose weight.
It also helps you fight depression. Exercise will release endorphins, which act as a natural pain reliever and an antidepressant. It also increases levels of serotonin in the body, which is a neurotransmitter that helps deal with anxiety, stress, and makes you feel generally happy. Exercise also helps regulate your sleep schedule, making it easier to fall asleep at night and get the rest you need to feel better.
2) Music
Music is a big stress reliever and an interesting tool that is available to all. Music has been proven to help reduce anxiety levels and help people focus. Softer music is generally used to reduce stress.
 Take some instrumental music and lay down for fifteen minutes, breathing and letting the music take you away. Focus on the music and forget everything else. This exercise should help you relax your body enough to continue properly with your day. This is a good technique t use when you want to relax during the day, it only take five minutes and can help you keep stress down as you go along. then there is music to help you focus on the task at hand.
This is a far more individual process. While instrumental music is generally relaxing the music that helps you focus can be varied. Everything from Heavy metal to smooth jazz can help you focus, you just have to find what you prefer. Personally I use a writing program called Omm Writer which plays soothing music and removes all distractions from the screen, but whatever works for you is best.
3) People and Pets:

Take a night off to play with your dogs or kitties and relax with your friends! This is incredibly simple. Just enjoy the company of those that you love, whether they be human or animal. Cuddle, play, watch a movie, eat, whatever it takes, just have fun.
4) Yoga and meditation:
Meditation is a powerful tool. It is defined as a practice in which the practitioner trains his or her mind or self-induces a mode of consciousness in order to realize some benefit. In other words its training yourself to be able to leave the present situation and place yourself in another space. It helps you look at your situation from a space which is not affected by your surroundings. There are different meditation techniques that can help you do this, but the easiest to start with is simply learning to use breathing to induce a meditative state.
 Yoga is another tool that is useful and quite common. There are many places (that are probably close by) that can teach you yoga, and once you know you can practice at home. You can relax and meditate using yoga and it is a powerful tool to train the body and mind.
5) Artistic expression:
 Painting, drawing, sewing, writing, cooking, the creative process in general is quite wonderful AND relaxing. To take something basic like paint, ingredients for a meal, charcoal, or anything, and work it and transform it into something you are proud of is a therapeutic process. there are two kinds of artistic processes that are good for relaxation. The ones that are mentally consuming, things like painting and drawing, which require all of your attention and focus. And things that are more repetitive and require less direct attention like knitting, amigurumi or sewing. these are more repetitive activities that let you focus on other things while you work or immerse yourself in the process. Art is an important tool for expression and stress relief, so go ahead, pick up a hobby.
GAH look at all this! Its so long! This, for me, is stress relief. I usually write about things that affect me, this way i can release some of my stress.. so why not make your own blog?

Exercising seems like something a bit difficult to do, especially when you are swamped with work. In reality it truly is, you come home tired, you wake up early, all you want to do is relax. Why bother?
First of all, it gives you energy. Wake up and do a small exercise routine, jog, stretch lift weights, whatever. After a few days on the routine it will be easier to wake up, and you'll look good. Also, it reduces the levels of cortisol, a stress hormone that makes you fat.. literally, it stores body fat and makes it harder to lose weight.
It also helps you fight depression. Exercise will release endorphins, which act as a natural pain reliever and an antidepressant. It also increases levels of serotonin in the body, which is a neurotransmitter that helps deal with anxiety, stress, and makes you feel generally happy. Exercise also helps regulate your sleep schedule, making it easier to fall asleep at night and get the rest you need to feel better.
 | ||
| It also makes you look sexy. |
2) Music
Music is a big stress reliever and an interesting tool that is available to all. Music has been proven to help reduce anxiety levels and help people focus. Softer music is generally used to reduce stress.
Take some instrumental music and lay down for fifteen minutes, breathing and letting the music take you away. Focus on the music and forget everything else. This exercise should help you relax your body enough to continue properly with your day. This is a good technique t use when you want to relax during the day, it only take five minutes and can help you keep stress down as you go along. then there is music to help you focus on the task at hand.This is a far more individual process. While instrumental music is generally relaxing the music that helps you focus can be varied. Everything from Heavy metal to smooth jazz can help you focus, you just have to find what you prefer. Personally I use a writing program called Omm Writer which plays soothing music and removes all distractions from the screen, but whatever works for you is best.
3) People and Pets:
Take a night off to play with your dogs or kitties and relax with your friends! This is incredibly simple. Just enjoy the company of those that you love, whether they be human or animal. Cuddle, play, watch a movie, eat, whatever it takes, just have fun.
4) Yoga and meditation:
Meditation is a powerful tool. It is defined as a practice in which the practitioner trains his or her mind or self-induces a mode of consciousness in order to realize some benefit. In other words its training yourself to be able to leave the present situation and place yourself in another space. It helps you look at your situation from a space which is not affected by your surroundings. There are different meditation techniques that can help you do this, but the easiest to start with is simply learning to use breathing to induce a meditative state.
5) Artistic expression:
Painting, drawing, sewing, writing, cooking, the creative process in general is quite wonderful AND relaxing. To take something basic like paint, ingredients for a meal, charcoal, or anything, and work it and transform it into something you are proud of is a therapeutic process. there are two kinds of artistic processes that are good for relaxation. The ones that are mentally consuming, things like painting and drawing, which require all of your attention and focus. And things that are more repetitive and require less direct attention like knitting, amigurumi or sewing. these are more repetitive activities that let you focus on other things while you work or immerse yourself in the process. Art is an important tool for expression and stress relief, so go ahead, pick up a hobby.GAH look at all this! Its so long! This, for me, is stress relief. I usually write about things that affect me, this way i can release some of my stress.. so why not make your own blog?
Subscribe to:
Posts (Atom)