2.6.11

Pirates Pirates Pirates!!!

A few days ago, I went to see Pirate of the Caribbean 4 and I fell in love. Not in love with Johnny Depp (who is quite sexy), not in love with Penelope Cruz (Who is also incredibly sexy). Oh no.  I fell in love with the wardrobe!! Oh You have no idea how much I wanted to wear EVERYTHING Penelope Cruz was wearing. In any case, I began Planning the Minute I got home, I wanted to take her wardrobe from the movie and adapt it to a style that I could wear. I decided on three outfits. A dress (though it ended up more as a top and skirt combo). A shirt, and a coat.

First the coat:
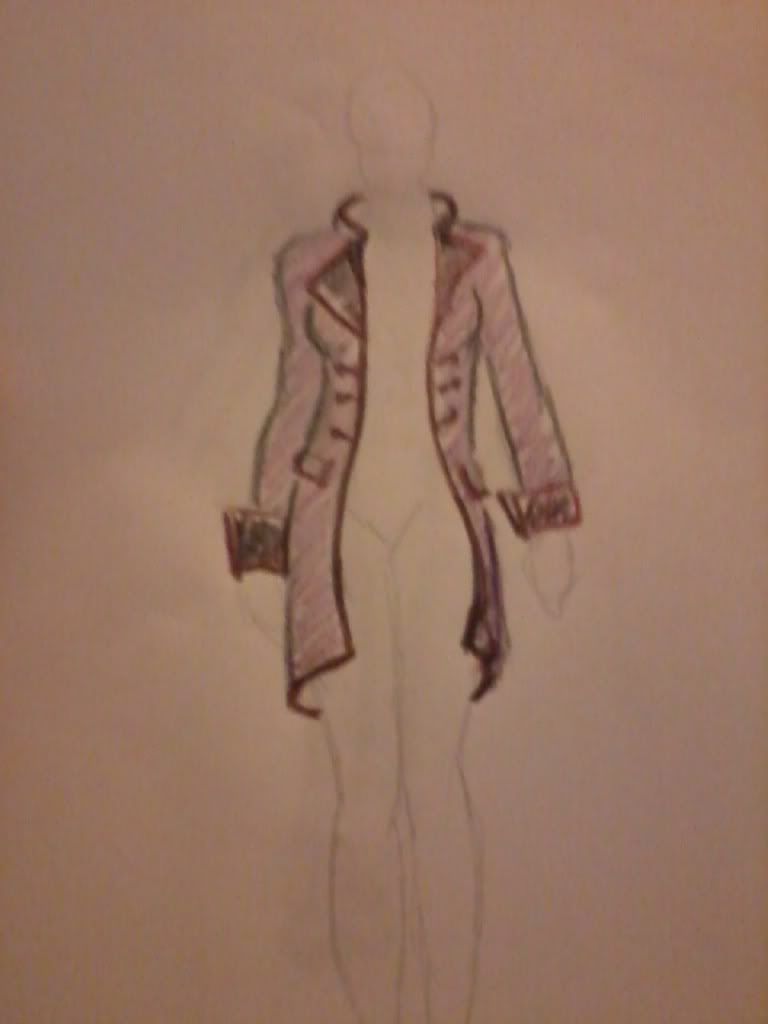
This is my version of the coat that she wears in the movie. I haven't changed much, only adjusted it slightly the buttons are something I'm still working on , but  I'll work it out better when begin the actual pattern.


Next comes the top:
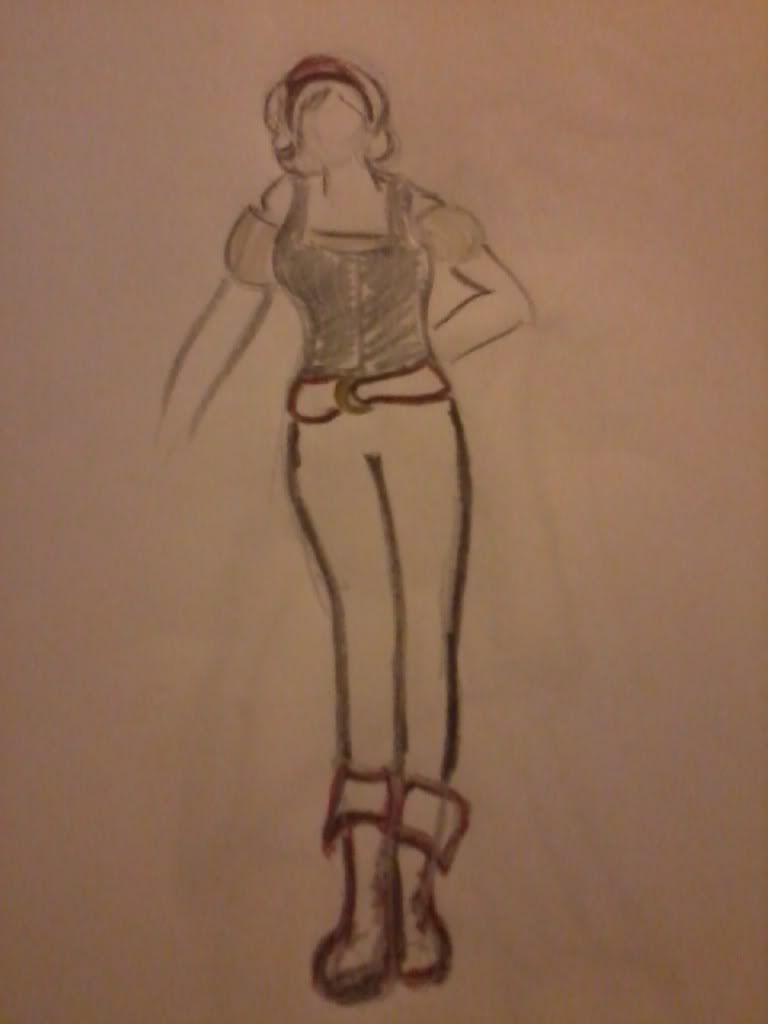
this is a simple vest and a white undershirt. It will go with tight pants, probably leggings and some nice boots. I need a rather large belt as well and a bandana to top it off. The only thing I'd be making right now is the vest.


And finally the 'dress':
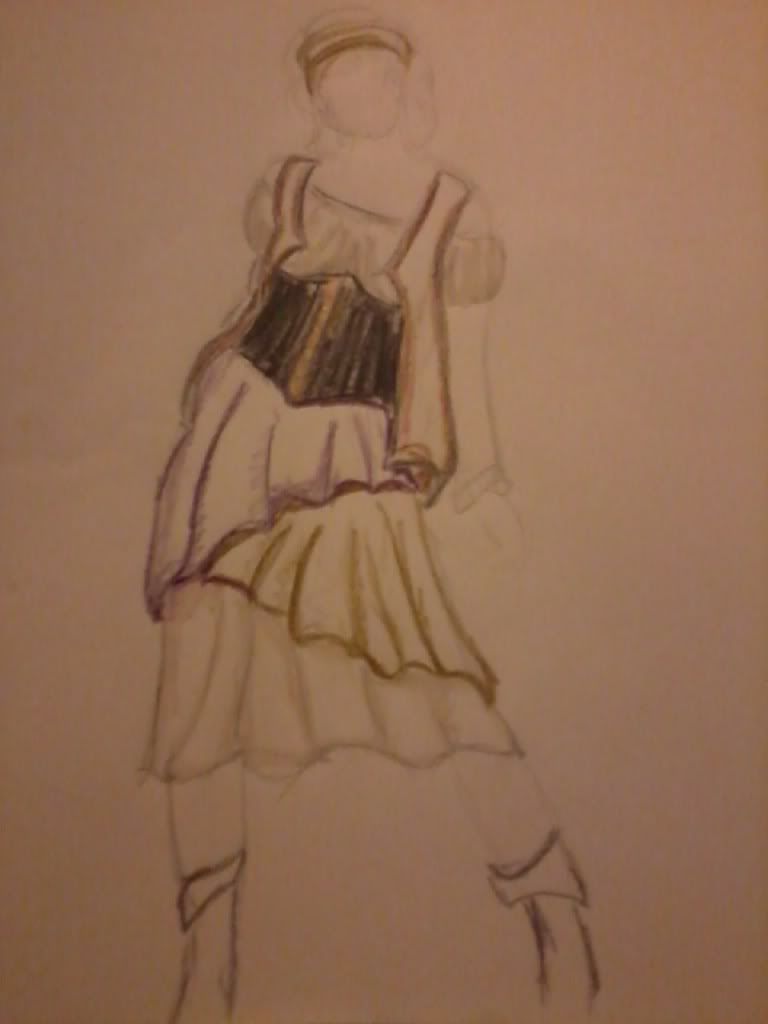
The dress incorporates the vest, its got to be a heavy fabric, I'd use floral or lace pattern probably. The and underbust corset with a lace front. and finally an uneven layered skirt, alluding to a typical wench skirt, but I want it to drape more.


Now I'm no expert in fashion or design in any way, so this is me just starting to make my own patterns... but SO far, this is definitely what I wanna try out next :)


Keep Your days in order!

I have created a calendar based on the Life Calendar concept.  you get to draw an image for every day that is pictured. Now As much as I like it, its a bit too big and too small. It has all of the days of the year, so too big, and its little images are just too small to add anything... so I made my own version, and of course, added my own touch to it!

Here is a picture of me actually using it:
Why is this so much fun...

27.5.11

Glass!


Now it is time for me to talk about something I actually know about: Flameworking.
Glassblowing is usually though of as a large setup. You have the furnace, glory hole, oven. Its thought of a big brawny men with a hugle glob of glass working and blowing and creating. But I'm here to talk to you about another type of glass-working. Flameworking or lampworing is the art of using a torch to work glass rods and tubes and melt them, using different tools and techniques to work them.
Now in this technique is what is used to make different scientific apparatus along with different glass artworks like glass beads and models.
See, I can still find cute animals to decorate my posts....
they're just made of glass...
Source


Now usually I would take the time to show you how to make things, but today I'm going to tell you how I started flameworking, and why I love it so, and maybe, you'll decide to try it too.
The truth is I was stressed, I wanted to try working on something or taking a class that would allow me to relax. As you already know I love to create and make things and I had always been interested in making things out of glass, so I looked for a class in my university. Alas, they had no such thing, but they did have a glassblower. A few emails, days and maps of the department basement later I was learning the basics of glass.

Now chemical glassblowing is different from artistic. For one thing the most commonly used glass is borosilicate, the type of flame and heat used to work borosilicate is different that that of artistic. I learned boro first. Now borosilicate is better for science, it withstands the shock or rapid temperature changes that characterize some reactions. Soft glass is usually used for artistic glassblowing. It needs to be heated slowly and has a tendency to crack when put into too hot a flame, the reason it is used for artistic glass though, is that it has beautiful bright colours that you just cant achieve with borosilicate. I was taught to put special glasses to protect my eyes, hot to use the torch, turn it on, control the different types of flames and work the glass.


This is what my desk usuallly looks like...
Source 
I started with simple pendants. I was taught how to melt a rod into a blob "It all starts with a blob" I was told. At the time I didn't realize how true this was. At first I went to have fun, look at how the glass melted; it was shiny and beautiful, it would melt and flow, glowing bright under my glasses. I wanted to see what I could do. At first it was just trying random things within the little I knew, but the more I went down there the more I became curious as to what the glassblower next to me was doing.  I began to ask and learn, first artistic, then scientific. Nothing specific, it was always how to make a seal, a flower, a giraffe. Slowly my curiosity evolved into something more, I began to look at the books my teacher had, I began to learn techniques, not so that I could try one thing, but with the purpose of putting them together, or making something more. After about a year of going in every chance I got I began to learn how to fix things. She had  so many things that were useless and broken. They were gifts of sorts, as labs moved out we were given their old glassware.

It was then that I began to realize that this was more than a hobby for me. As i learned how to fix simple cracks I learned to admire what my teacher did in a new light. I watched her fix things with this flow and ease that escaped me every time I tried to do the same. I began to practice fervently, trying to learn what I could, gathering the courage to ask her if I could help around the shop. I had jokingly suggested it before, but it wasn't until a series of events made my working there a possibility that I began to really work.
Now I am thinking about studying this as a profession. Of changing everything I had once thought to do because this art has enthralled me beyond my wildest imagination.


23.5.11

Painting for fun :D


Painting is one of my favorite pastimes. To take paint and create (which you already know I love doing) is seriously fun; but it can also be very intimidating. SO how do you go about making a nice painting?

Well as anything practice is the key but there are certain steps that you can follow to get better at your work.
Well the first step is really choosing what to draw.  If you start with a drawing you'll get a good idea of what works and what doesn't. Be sure to use the drawing to not only get the shapes of things, but to define lights and darks. you can do it black and white, or colour, whatever you decide make sure you deveop your concept. You don't have to have everything laid out perfectly, but define the parameters of what you want. Here is an example drawing of a painting i recently started. Its coloured and defines what I want. I just had a concept and ran with it.

The second step for me is drawing on the canvas and choosing a colour palette.  The palette for my painting will be based mostly on the colour blue so i painted the base in blue. Basically draw what you can in a really liquified state. I guess here we need to talk about materials, I paint with oil and watercolour mostly, but acrylic is a good option as well. With oil use paint thinner (turpentine, mineral spirits, ect.) to water down your paint, both acrylic and watercolor can be watered down by water (duh!). But this watered down version gives you an idea of what you need while still giving you the freedom to fix things that look weird with thichker coats of paint later.


Now we can start with thicker coats of paint. The more paint you add, remember, the harder it is to change later. But really the most unforgivable medium of the three is watercolour which is difficult to handle. once the paper absorbs something, its nearly impossible to fix, so that planning stage is very important for watercolor. This painting that you are looking at is in oil, which is most forgiving. the paint takes days to try so you have a chance to clean it off.


This is the place to make changes, start adding the colors and change everything. Try to work in layers. The things you want to be in the background work on first. and the build on it. Those things that you want the person to focus on most work on them in detail. Pull things forward by working on them, when you look at something you naturally take in the detail of what is in front of you first, the more you focus on an object the more the objects in the background become fuzzy, use this to your advantage. Now, you can also make big changes and move things. Remember that the paint can cover itself. If you work with acrylic wait for it to dry to cover things. If its oil use the thinner to remove paint or paint over what you have., but remember oil will mix with itself, if it is still wet.


This is what I have so far, but mind you I'm not done. You can spend as much time as you want on a painting, until you think is done or you grow tired of it (I have done that, just leave it for a while, then pick it up again).
I hope this helps! I don't know how useful it really is, but these are the steps that I use to paint things.


21.5.11

Mario blanket!!

Hey!  remember that post where I talked about the Mario blanket i was working on? We behold!  it is almost done!! BWAHAHAHAHA!!!


YESSSSSSS

Its still missing a few things, it gets a tunnel in the second lvl and it gets a grey trim around it  with a grey backing as well... but that takes a sewing machine, which i lack.. but when I can, I will!